I am going to tell you some more about creating functions in Python in this blog. In the blog about calling functions of last week I already explained a little bit about making your own functions. In this blog I am coming back on that subject. User-defined functions are really nice to use, because you only need to define the function ones. After that you can easily use them on different spots in your script, without the need to write it again. That can also result in a better overview of your code. To use user-defined functions can also be very practic when you are doing assignments in groups. Everybody can write an own user defined function in different files. In that way you can work with the whole group at the same time on a code.
So to create your own function, you first need to make a function. In this blog I am going to use the function again that I created for WSQ02. So the name of this file is also WSQ02. To use this as a function in a new file, you only need to import it:
There is also a totally different way to define your own functions. You need to define those functions in your own script. So first you start the line with ‘def’ (from define). After that you need to put a space and type the name that you want to assign to the function. For example if the functions is about cookies, you can fill up the line with that and you get ‘def cookies’. After that you need to make the input for your function between brackets and end with a colon. So for example, you can have three different input and the function becomes: ‘def cookies(quantity, shape, ingrediënt):’. After you defined your function you have the print it in the same way, so you get: ‘print(quantity, shape, ingrediënt)’. After that you can define the input of your function: ‘cookies(quantity=’5′, shape=’round’, ingrediënt=’chocolate’). If your run it will give you 5 round chocolate:
Because of the fact that you defined this function in your script and not only use it, it is possible to wright some code and after that use your cookies functions again:
So in this blog I described some more about user defined functions, calling them and using them. I hope you enjoyed it, understand it and learned a couple of new things!
In this post I am going to explain how you need to use already existing functions in Python and I am going to demonstrate the use of them.
This site gives a clear overview of all the built-in functions in Python that you can use with an explanation what the function does. So that is a nice site to keep at hand while programming.
I am going to make the demonstration with the first function in the list: abs(). This function returns the absolute value of a number. It is for example useful for complex numbers:
Another example is the use of the function sum(). This function adds everything up in the variable that you put in the function. For example:
Both examples above her are functions that are built-in in Python. So it is not necessary to import them from a Python module. There are also function that are not build-in and you have to import them. For example the function π, if you want to use π you need to import the module math. If you don’t do that you get the error that pi is not defined:
Therefore you need to import the module math (import math) and type math.pi instead of pi:
If you do it in this way, pi gives you the value of π . If you think that is is annoying to type math.pi, you can also do it on the way below. You get in this case the same information in your shell as in the example above
And the last thing that I want to explain is that you can also import your own modules. For example, for another assignment (WSQ02) I made a file. If you import that file (import WSQ02), you can use the information out of that file. That file contains information about Fahrenheit and degrees and you can use that as you can see in this example.
Hopefully you enjoyed reading my blog again and have you learned new stuff!
There are a couple of ways to gain input. First I am going to explain the easiest ways to gain input:
The first one is just type: input() and run. In the command window/ shell is it then possible to type the input that you want. Click here to see what I did.
Your input is always what you type in your shell window. So for example if you define your input: a= input(“how are you doing?”), then it is not going to save this as variable a. It is going to safe what you type in your shell window. To see the example, click here.
This is my opinion a short overview about the important thinks that you can do with input. Of course there are more ways to apply input, but these two are the most simple and in my opinion the most common used.
In my former blogs, I already explained a couple of thinks that you can get as output while using print(). I am going to repeat a couple of them and explain some new things that print() can do:
If you just use print(abcd), Python is going to print the value of abcd. So if you use print(abcd), you first need to define abcd with a value:
If you use print(“abcd”), Python is going to print just abcd, so you don’t need to define something first:
You can also combine this, but then you need to place a comma in between the parts.
Print can even display lists, dictionaries and built in function, as long as you keep separating them with commas:
You can also put in your print the way that the different segments needs to be separated. You achieve that by adding in your print sep=’-‘. Between the quotes you can put the way of separating them. In this example I used a line, a > and a question mark to separate the segments:
Hopefully you learned a lot of new things that you can do with print!
In this blog, we are going to explore some more about the use of the basic types in Python. Python has a couple of built-in types that you can use while typing your code. I am going to explain a couple of them ordered from the most simple to more difficult.
First integers, integers are just normal whole numbers. In Python is it possible to make them as long as you want (until your own memory on your computer can’t handle it anymore). To print them, you just have to type: print(“integer”). See my example in Thonny. There are also three kind of preset integers in Python; the binary (b), octal (o) and hexadecimal (x) integers. To make these integers you have to print zero (0), the letter that stands behind the integer name and the value that you want to make of it. So if you want the integer two times each other it is 100 behind the letter. Three times each other is 1000 behind the letter. So for example the binary is print(0b10) gives you 2. Print(0x100) gives you 16*16. In my example I showed a couple:
You can alos make float numbers, those numbers are not whole numbers, but have decimals behind the comma. There are two different ways to work with the difference between integers and float numbers. The first thing that you can do is asking Python with which of two you are working. The output is the type in that case. You can also print the number that you want and yout output will display it. You can also use the scientific notation for it and the output becomes the number as float. You can also adapt a float to an integer in different ways. You can use the function “round” to round your float: 1.3 becomes 1 and 1.8 becomes 2. Another way is to use “int”, that rounds it to the closest number to zero: so 1.3 and 1.8 becomes 1.
It is also possible to let Python work with complex numbers. They are expressed as: “number +numberj”, so far example 12+8j. You can also ask for what type it is:
While working with Python, you are going to use strings quite often. Strings is very easily just printing text or variables. If you want to print text, you need to put the text between single quotes and single brackets. To print the value of a variable, you only need to put it between single brackets, of course you need to define the variable first. If you want to combine the value of a variable with text, you need to do exact as described here and divide the text and variable with a comma. If you want a quote in the text of your string, you need to use double quotes to begin and end your text. If you want to use double quotes in your text, you need to open and end your string with single quotes. Another way to achieve quotes in your string is to use a slash in front of the quotes.
I explained in this log a couple of the most basic types with Python. If you want more information this site can useful. Hopefully you understand everything you read here!
The next assignment, how I understood it, is to figure out what the Zen of Python is, how you have to open it and my interpretation of the rules.
So, to give an answer on the first question I just asked Google (cause everything, not only help with Python, that you want to figure out, start with asking Google). Google is your best friend with figuring stuff out. So when I asked Google I got this site. Unfortunately, it gave more the answer to my second question so let’s answer that first. To open the zen of Python you have to type: print this (see my script). If your run your script after that, it will give the content of the zen in your shell:
The zen of Python is written by Tim Peeters. He made it as guiding principles for writing Python language. It consists of 20 guidelines, 19 of them are filled in by himself and the 20th rule was meant to fill in by Guido van Rossum, the original writer of the Python language, but he never filled in the last rule.
And now over to my interpretation of the rules. The first 6 rules consists information about what is better according to Tim:
Beautiful is better than ugly.
Explicit is better than implicit.
Simple is better than complex.
Complex is better than complicated.
Flat is better than nested.
Sparse is better than dense.
In my opinion, every person is meaning something different when they make such rules, but it is a good guideline. The first six rules are mostly about how your code must appear and what it has to look like. Timo maybe wanted to achieve people to think better about what they are writing. It has to be good structured to recognize it afterwards, that way it has to beautiful, explicit, simple, not nested and sparse. If you write it like this, your code stays clear and understandable for other people and yourself at a later time. This is important for Python, because his popularity is partly a result of his clearness.
The seventh rule “Readability counts” has also everything to do with how important it is to write your code clear. The explanation therefore is that a code is more often is being read then written.
The eight and ninth rule are “Special cases aren’t special enough to break the rules. Although practicality beats purity.” This is actually a contradiction, because the second sentence contradicts the first one.
The tenth and eleventh rule “Errors should never pass silently. Unless explicitly silenced.” This rule is about errors, it is way much easier to recognize your error close by, so don’t let them pas silently and always fix the errors how small they are.
The twelfth rule “In the face of ambiguity, refuse the temptation to guess.” I would think that this rule is about that you have to think about what you’re doing and if something in your code happens, you have to know why it happens. Don’t only guess and be happy if it is working, you always need to critical think about if it is really working and why and that it is not only a coincidence.
The thirteenth rule “There should be one—and preferably only one—obvious way to do it. “ prefers only one obvious way to do it, because that makes it a lot more easy for everybody. In the case that there is only one way, everybody only has to know that one way. That prevents unnecessary time of learning.
I don’t really understand the fourteenth rule “Although that way may not be obvious at first unless you’re Dutch.” even when I am Dutch. So yeah, use your own interpretation about Dutch people in this rule. Probably it has something to do with the fact that the maker of Python, Guido van Rossum, is Dutch.
The fifteenth and sixteenth rule are “Now is better than never. Although never is often better than *right* now.” With my interpretation, this rule has something to do with writing and finishing the code that your are writing. Right now is not always possible, because you need time to think about what you are writing and it can be frustrating if you really want to finish it right now. But don’t wait to long, because you still need to know what you are doing and trying.
The seventeenth and eighteenth rule “If the implementation is hard to explain, it’s a bad idea. If the implementation is easy to explain, it may be a good idea.” is also about making your code so easy as possible, most of the time there must be an easy way to achieve what you want. The easiest way is always the best, because it is good if other persons understand your code.
The nineteenth and last rule is “Namespaces are one honking great idea — let’s do more of those!”. Use them, because it gives your code a clearer overview.
I agree with all this rule, it is very important to make your code clearer and readable for everyone. Hopefully you liked my view on these rules!
Because of the fact that I don’t know how to make comments, I begun searching on the internet. I reached this site with a lot of information about commenting in Python. So, let’s follow the site and try to do that in Python. Btw, to make a black enter in python you can just type print(“\n”). Use that, because it makes the output of your script clearer. Okay, back to the comments. Comments are important to make explain what you are doing. In that way, it is possible that other people understand what you did and you also still can understand what you did if you look after a year or something again to your blog. I will add the comments on my script of my last blog. – The first way to make comments at your blog is the easiest way, just use a hashtag (#). Every thing that you type behind the hashtag, at the same line, will be ignored during running the blog. So if you start on a new line, you need to put a new # in front of it. – If you are to lazy to put on every new line a new #, you can also use three quote signs at the beginning and ending of your comment. – If you select in Thonny a specific piece of script and press Ctr+3 you toggle comment the piece of text. So if not everything is a comment, you add a hashtag before every rule (so make a comment of every rule) and if everything already is a comment it erases the # everywhere (lines with at that moment two hashtags stay a comment). You also have Alt+3 and that adds a hashtag in front every selected line. The last option is Alt+4 and that erases a hashtag in front of every line. The script were I ended with trying everything is this script. You can still see the hashtags and the quote signs. Hopefully you learned something from this!
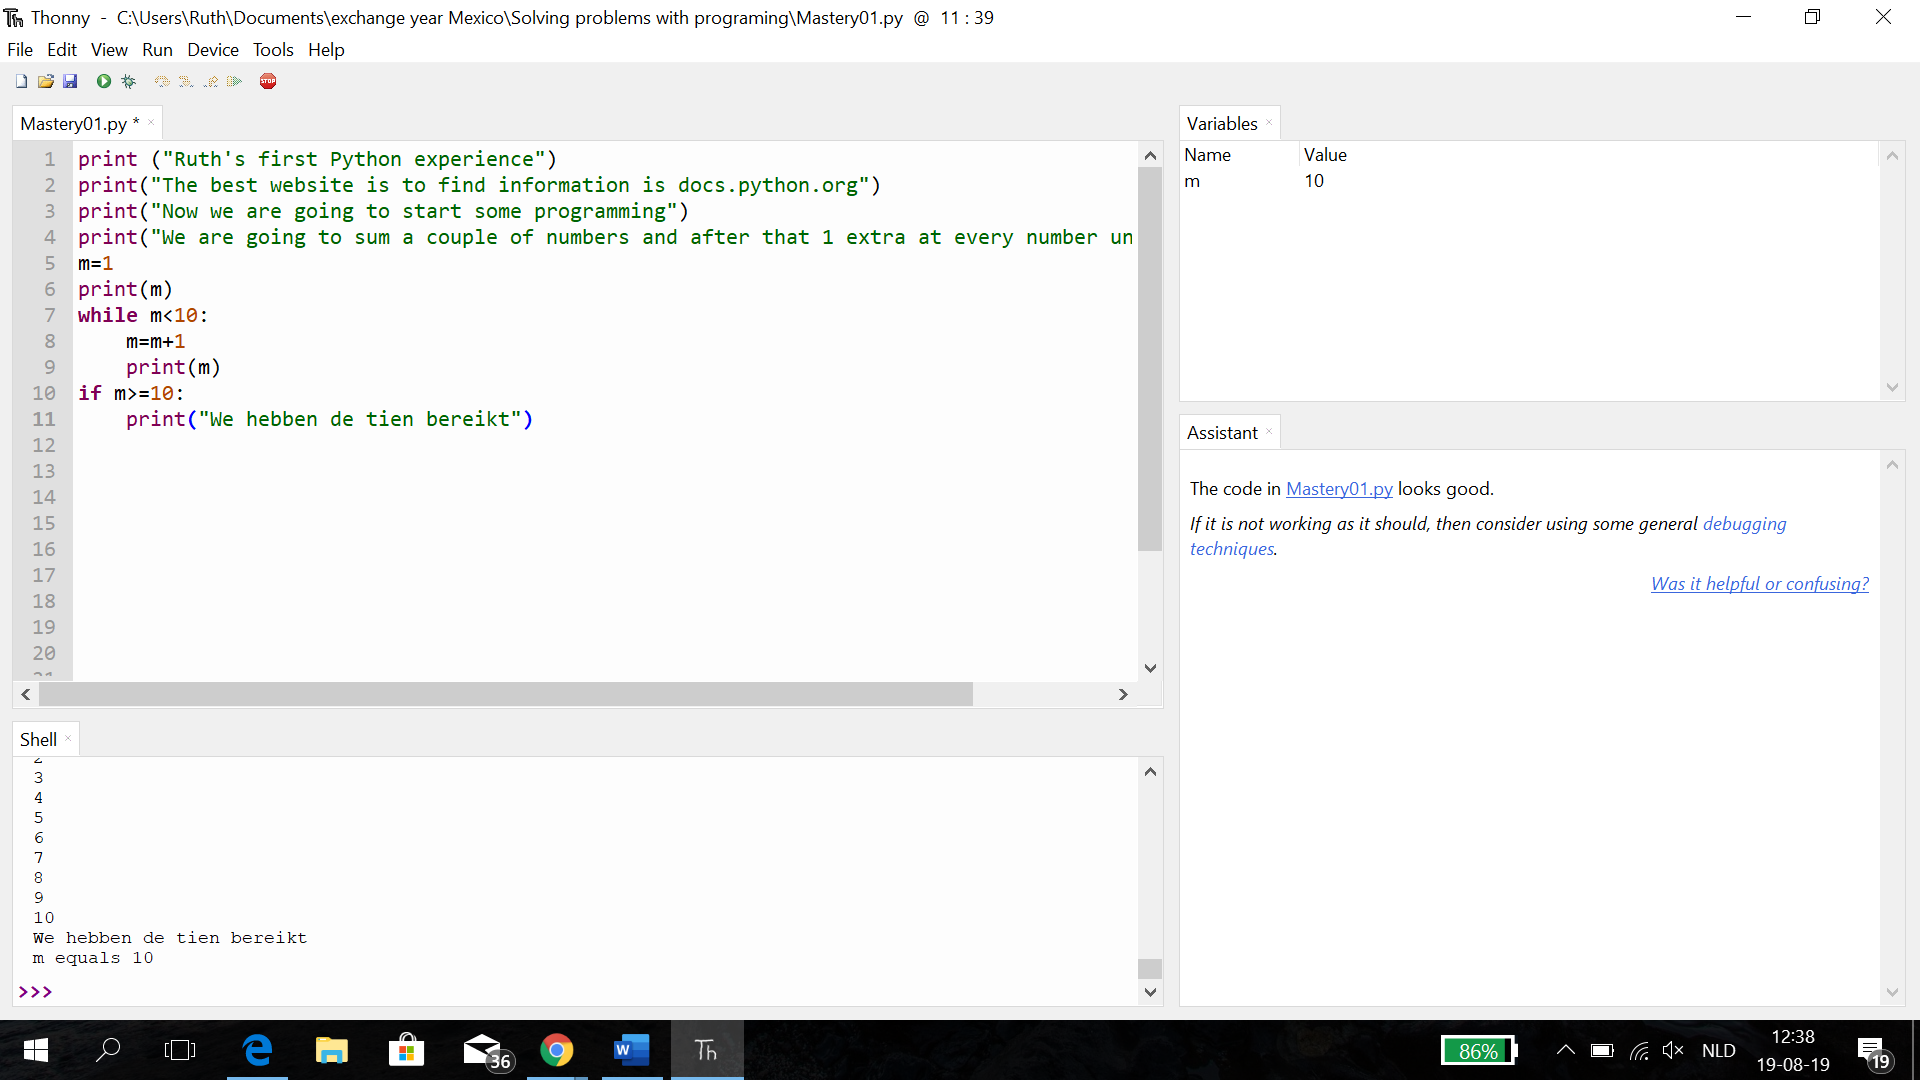
Hey guys! In my first blog I said that we are using another program then Python for the programming. In this class today I found out that it was Thonny, so now I am using that and it’s looks easier than the Python. I started to use it with thinking what I wanted to achieve. So, I decided to want my variable m to count to ten and when it reaches ten and must say that it reached ten. (sorry I a made my script in Dutch). But after a lot of trying it worked out. To achieve this you first need to produce a variable with a name (in my case m) that gets a value (in my case 1). After that you need to produce a loop that checks every time if the variable m is still belowe ten (m<10). And you need to tell Thonny that he has to count plus one if it is the case (m=m+1). And of course you need Thonny to display the value of m to control it a little bit (print(m)). Okay that was the second step to achieve this. Now we are at the third and final step: we need to tell Thonny that if the value of m is 10 or higher (with my thing was equal to ten also enough, but ten or higher is safe for the case that you use m+2,3,4 or 5 instead of one) he needs to say: we achieved ten. And that is the last two lines of my script (see picture below). Now this has worked out, I think my first script worked.
Okay, sadly I found out after I wrote my blog that there was an assignment that we needed to make.
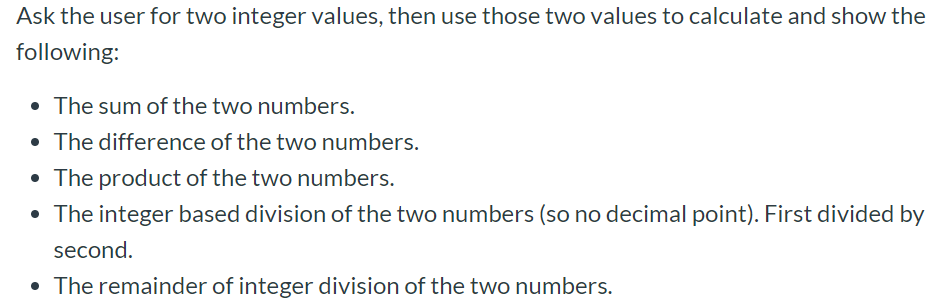
So, now I am going to explain what I did during the assignment. This was the assignment that we needed to make:
So, now I am going to explain what I did during the assignment. This was the assignment that we needed to make:
And this is the script that I used to achieve this and the result that it gave:
If you want to do this with other numbers it is just possible to change the value of a and b. To open my blog, click on the picture of my script. In the variable menu at the upper left you can see the values of the variables that I made. I think it works very practical to open this window, because it shows you exactly what Thonny is doing with your numbers. You can open it with view –> variable.
You can see different value of f in my variable menu and they all have something to do with the integer. With the “//” (f1) is rounding it downwards. The “round” function rounds it in my case to the closest number with 0 decimals behind the comma. If you put round(f,2) you get a number with 2 decimals.
So, today I start my first post on my first blog. I am a dutch student that is for one semester in Mexico, Guadalajara. Because the fact that I probably don’t get any credentials for one of my courses here am I only participating courses that interests me. So for that reason I have the courses Spanish, Mexican cultures and one programming course. I don’t have experience with programming (only a little bit of Matlab), but I think it can be cool. So, like I already said, this is my every first blog and I am not feeling very comfortable with blogging. S0, I don’t really have a clue about what I need to say in this, but for now I will share with you my kind of programming dairy. The fact that I did not started with programming yet makes it a lot harder to make up the content. I already installed Python on my laptop during the first course, but during the last course were we using something else (I have to found out that name again). I am typing this now and it is already pretty late for me (I went this morning hiking at 7 a.m. and after that I went to Tlaquepaque), so I am going to end my first blog. Apologies for the less content in my first blog, but I hope you enjoyed it.